本文基于Glide 4.11.0

阅读前请参考Glide 源码分析解读-基于最新版Glide 4.9.0一文,该文章中,将Glide中各个部分的作用分析的非常好了。

Glide几乎是现在做Android图片加载的最佳选择了。如此优秀的一个框架是如何实现的呢?如果让我们自己来实现该怎么做呢?我们就通过自己实现一个低配版Glide的方式,来探究Glide中是如何实现的。

我们就称我们自己低配版Glide为Slide。那么Slide要实现哪些功能呢?简单来说,就是获取图片+界面显示。我们通过先构架大体框架,再分步丰富其中细节的方式,来构建Slide的整体结构。

1
2
flowchart LR;
A[获取图片] --> C[Slide] --> B[界面显示];
1
Glide.with(xxx).load(url).into(iv);

这是Glide一个典型的最为简单的调用过程。那么在这个过程中发生了哪些事情呢?

我们可以通过这个链式调用的返回值发现,有如下过程:

1
2
3
4
graph LR;
style A fill:#aaffcc
style D fill:#ffaa99
A(Glide) -->|"with(xxx)"| B(RequestManager) -->|"load(xxx)"| C(RequestBuilder) -->|"into(iv)"| D(Target);

Glide.with(xxx)发生了什么事?

阅读源码发现,Glide.with(xxx)的最终实现类是RequestManagerRetriever.java类。继续跟踪,我们在这个类中,看到这样一个方法。

1
2
3
4
5
6
7
8
9
10
11
12
13
@NonNull
private RequestManager supportFragmentGet(
@NonNull Context context,
@NonNull FragmentManager fm,
@Nullable Fragment parentHint,
boolean isParentVisible) {
SupportRequestManagerFragment current = getSupportRequestManagerFragment(fm, parentHint);
RequestManager requestManager = current.getRequestManager();

.....

return requestManager;
}

重点关注这个getSupportRequestManagerFragment方法。

1
2
3
4
5
6
7
8
9
10
11
12
13
14
15
16
17
18
//getSupportRequestManagerFragment
@NonNull
private SupportRequestManagerFragment getSupportRequestManagerFragment(
@NonNull final FragmentManager fm, @Nullable Fragment parentHint) {
SupportRequestManagerFragment current =
(SupportRequestManagerFragment) fm.findFragmentByTag(FRAGMENT_TAG);
if (current == null) {
current = pendingSupportRequestManagerFragments.get(fm);
if (current == null) {
current = new SupportRequestManagerFragment();
current.setParentFragmentHint(parentHint);
pendingSupportRequestManagerFragments.put(fm, current);
fm.beginTransaction().add(current, FRAGMENT_TAG).commitAllowingStateLoss();
handler.obtainMessage(ID_REMOVE_SUPPORT_FRAGMENT_MANAGER, fm).sendToTarget();
}
}
return current;
}

其实,这里是一个Glide检测到界面生命周期的关键了。Glide就是通过像当前Activity添加一个一个无UI的Fragment来探测生命周期的

注意:在执行了添加fragment的语句fm.beginTransaction().add(current, FRAGMENT_TAG).commitAllowingStateLoss()后,又马上通过handler发送了一个一个message,这里需要熟悉Handler机制才能理解,简单来说,就是添加fragment操作,实际上也是通过handler执行的,这是一个异步的过程,如何检测到fragment已经添加完成了呢?就是在commitAllowingStateLoss后,马上去发送一条指定的消息,利用handler处理message的顺序性,来获知fragment已经添加完成。

经过添加SupportRequestManagerFragment后,我们获得了探测当前界面生命周期的能力。

继续阅读supportFragmentGet方法代码,RequestManager是从SupportRequestManagerFragment拿到的,如果拿到的是空,则创建一个,设置到该fragment当中去。

RequestManager.load(xxx)发生了什么?

我们以load(url)为例,来探究这部分代码。

这个方法,返回的是RequestBuilder这个类,看名字就知道,这是一个构建者模式中的Builder类,主要是在添加各种配置项,比如RequestOptions、RequestListener等。

RequestBuilder.into(iv)发生了什么?

其实,这里才是真正开始触发发起请求的地方。

RequestBuilder

我们把into(ImageView)方法作为入口,一路跟踪,可以发现最终的实现是如下方法。

1
2
3
4
5
6
7
8
9
10
11
12
13
14
15
16
17
18
19
20
21
22
23
24
25
26
27
28
29
30
31
32
33
34
private <Y extends Target<TranscodeType>> Y into(
@NonNull Y target,
@Nullable RequestListener<TranscodeType> targetListener,
BaseRequestOptions<?> options,
Executor callbackExecutor) {
Preconditions.checkNotNull(target);
if (!isModelSet) {
throw new IllegalArgumentException("You must call #load() before calling #into()");
}

Request request = buildRequest(target, targetListener, options, callbackExecutor);

Request previous = target.getRequest();
if (request.isEquivalentTo(previous)
&& !isSkipMemoryCacheWithCompletePreviousRequest(options, previous)) {
// If the request is completed, beginning again will ensure the result is re-delivered,
// triggering RequestListeners and Targets. If the request is failed, beginning again will
// restart the request, giving it another chance to complete. If the request is already
// running, we can let it continue running without interruption.
if (!Preconditions.checkNotNull(previous).isRunning()) {
// Use the previous request rather than the new one to allow for optimizations like skipping
// setting placeholders, tracking and un-tracking Targets, and obtaining View dimensions
// that are done in the individual Request.
previous.begin();
}
return target;
}

requestManager.clear(target);
target.setRequest(request);
requestManager.track(target, request);

return target;
}

这个方法主要是做了以下事情:

  1. 是否已经有一个request在处理相同的请求,如果有,则判断是否正在运行,没有正在运行则开始运行;
  2. 如果没有一个request在处理此请求,则对target做一些清理操作,与之前的请求解绑,为当前target设置新的请求,然后requestManager开始追踪这个请求。

接下来我们就按照requestManager.track(target, request)这段代码继续追踪。来到RequestManager的track方法。

RequestManager

1
2
3
4
synchronized void track(@NonNull Target<?> target, @NonNull Request request) {
targetTracker.track(target);
requestTracker.runRequest(request);
}

这个方法很简单,只有两个方法。

TargetTracker

1
2
3
4
5
6
private final Set<Target<?>> targets =
Collections.newSetFromMap(new WeakHashMap<Target<?>, Boolean>());

public void track(@NonNull Target<?> target) {
targets.add(target);
}

这里把一个target存放在WeakHashMap中,因为target是与生命周期有关的东西,比如ImageView对应的ImageViewTarget,所以这么做是为了防止内存泄漏。

RequestTracker

1
2
3
4
5
6
7
8
9
10
11
12
13
/** Starts tracking the given request. */
public void runRequest(@NonNull Request request) {
requests.add(request);
if (!isPaused) {
request.begin();
} else {
request.clear();
if (Log.isLoggable(TAG, Log.VERBOSE)) {
Log.v(TAG, "Paused, delaying request");
}
pendingRequests.add(request);
}
}

这里是将暂停的request加入到pendingRequests中去,如果不是暂停的request,则调用其begin方法。

我们查看Request类的子类,可以看到下图。

request_implementions

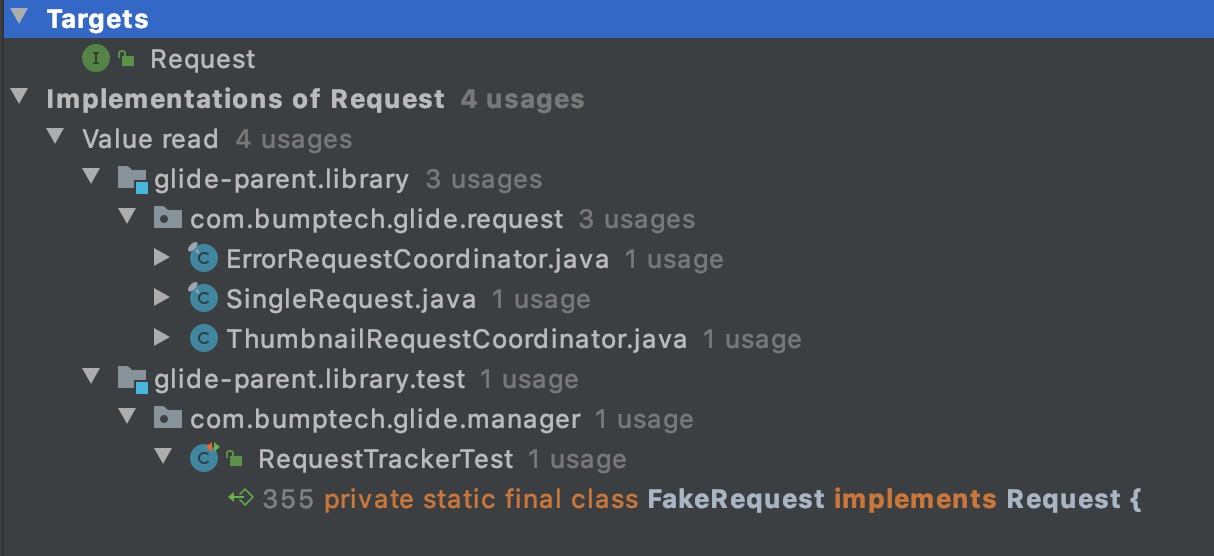
可以看到一共有4个类实现了Request类,其中FakeRequest类是用于测试的,不去考虑。其他三个类的作用如下:

  1. ThumbnailRequestCoordinator: 用来加载thumbnail;
  2. ErrorRequestCoordinator: 用来加载错误时候,展示错误状态;
  3. SingleRequest: 这才是用来加载目标图片的request。

我们重点去看SingleRequest的begin方法。

SingleRequest

1
2
3
4
5
6
7
8
9
10
11
12
13
14
15
16
17
18
19
20
21
22
23
24
25
26
27
28
29
30
31
32
33
34
35
36
37
38
39
40
41
42
43
44
45
46
47
48
49
50
51
52
public void begin() {
synchronized (requestLock) {
assertNotCallingCallbacks();
stateVerifier.throwIfRecycled();
startTime = LogTime.getLogTime();
if (model == null) {
if (Util.isValidDimensions(overrideWidth, overrideHeight)) {
width = overrideWidth;
height = overrideHeight;
}
// Only log at more verbose log levels if the user has set a fallback drawable, because
// fallback Drawables indicate the user expects null models occasionally.
int logLevel = getFallbackDrawable() == null ? Log.WARN : Log.DEBUG;
onLoadFailed(new GlideException("Received null model"), logLevel);
return;
}

if (status == Status.RUNNING) {
throw new IllegalArgumentException("Cannot restart a running request");
}

// If we're restarted after we're complete (usually via something like a notifyDataSetChanged
// that starts an identical request into the same Target or View), we can simply use the
// resource and size we retrieved the last time around and skip obtaining a new size, starting
// a new load etc. This does mean that users who want to restart a load because they expect
// that the view size has changed will need to explicitly clear the View or Target before
// starting the new load.
if (status == Status.COMPLETE) {
onResourceReady(
resource, DataSource.MEMORY_CACHE, /* isLoadedFromAlternateCacheKey= */ false);
return;
}

// Restarts for requests that are neither complete nor running can be treated as new requests
// and can run again from the beginning.

status = Status.WAITING_FOR_SIZE;
if (Util.isValidDimensions(overrideWidth, overrideHeight)) {
onSizeReady(overrideWidth, overrideHeight);
} else {
target.getSize(this);
}

if ((status == Status.RUNNING || status == Status.WAITING_FOR_SIZE)
&& canNotifyStatusChanged()) {
target.onLoadStarted(getPlaceholderDrawable());
}
if (IS_VERBOSE_LOGGABLE) {
logV("finished run method in " + LogTime.getElapsedMillis(startTime));
}
}
}

代码虽长,但是结构简单。主要做了以下事情:

  1. 检查model是否是空,model就是要加载的数据来源,比如url、resourceId、File等;
  2. 判断request状态,不能重新开始一个正在运行的请求;
  3. 判断request状态,如果是已经完成的请求,则说明资源已经存在,直接调用onResourceReady方法并返回;
  4. 接下来就来到判断target尺寸的过程了,如果target尺寸已经确定,比如view尺寸measure结束后,则调用onSizeReady方法,注意:实际的网络请求就在这个onSizeReady方法中,因为只有target的尺寸确定了,才能进行请求并处理图片;
  5. 如果尺寸未确定,则调用target.getSize方法去监听尺寸事件,具体可以参考ViewTarget#getSize方法,这是一个通过onPreDrawListener来监听尺寸的;
  6. 接下来回调onLoadStarted方法,并且显示加载过程状态。

我们着重看网络请求那个分支,也就是onSizeReady方法。

1
2
3
4
5
6
7
8
9
10
11
12
13
14
15
16
17
18
19
20
21
22
23
24
25
26
@Override
public void onSizeReady(int width, int height) {
......
loadStatus = engine.load(
glideContext,
model,
requestOptions.getSignature(),
this.width,
this.height,
requestOptions.getResourceClass(),
transcodeClass,
priority,
requestOptions.getDiskCacheStrategy(),
requestOptions.getTransformations(),
requestOptions.isTransformationRequired(),
requestOptions.isScaleOnlyOrNoTransform(),
requestOptions.getOptions(),
requestOptions.isMemoryCacheable(),
requestOptions.getUseUnlimitedSourceGeneratorsPool(),
requestOptions.getUseAnimationPool(),
requestOptions.getOnlyRetrieveFromCache(),
this,
callbackExecutor
);
...
}

关键代码来了!这个engine就是Glide的核心。这个engine是在Glide初始化时候生成的一个实例。

Engine

Engine不只是用于加载图片,而是一个任务执行核心引擎,它要执行的不只是请求远程图片的任务,包括解码任务等,它执行的实际上是一个个的job。

跟踪上一阶段中的engine.load方法,来到是这个方法的关键部分——调用waitForExistingOrStartNewJob

在这个方法中,主要做了以下事情:

1
2
3
graph TD;
A{{是否有一个job执行相同操作}} --> |有|B[为此job添加新的回调];
A --> |无|C[添加并执行一个EngineJob];

EngineJob.start(decodeJob)

1
2
3
4
5
6
public synchronized void start(DecodeJob<R> decodeJob) {
this.decodeJob = decodeJob;
GlideExecutor executor =
decodeJob.willDecodeFromCache() ? diskCacheExecutor : getActiveSourceExecutor();
executor.execute(decodeJob);
}

这里执行的是decodeJob。

这里需要着重关注一点,就是executor.execute(decodeJob)的时候,就已经通过GlideExecutor的sourceExecutor.Builder创建了一个ThreadPoolExecutor,也就是在这里实现线程池异步执行任务。ThreadPoolExecutor并不是Glide提供的实现,而是在java.util.concurrent包下。

DecodeJob

DecodeJob是一个Runnable类,所以,我们查看其run方法。

接下来的调用路径参考下图。

1
2
3
4
5
6
7
8
9
10
graph TD;
subgraph DecodeJob;
A(run) --> B[runWrapped] --> C[runGenerators] --> D[getNextGenerator];
end;
subgraph SourceGenerator
D --> E[startNext] --> F[startNextLoad];
end;
subgraph HttpUrlFetcher
F --> G[loadData] --> H[loadDataWithRedirects];
end;

经过这么长的调用链,我们终于来到了网络请求的部分,我们可以看到Glide原生使用的HttpURLConnection进行网络请求的。获取到InputStream后,在SourceGenerator中的cacheData方法进行缓存处理。

获取到数据后的处理

通过DataFetcherGenerator.FetcherReadyCallback可以探知到数据获取成功或者失败,如果获取成功,则在DecodeJob#onDataFetcherReady中处理。关键代码如下:

1
2
3
4
5
6
7
8
9
10
public void onDataFetcherReady(
Key sourceKey, Object data, DataFetcher<?> fetcher, DataSource dataSource, Key attemptedKey) {
.....
if (Thread.currentThread() != currentThread) {
runReason = RunReason.DECODE_DATA;
callback.reschedule(this);
} else {
.....
}
}

更改任务状态,重新执行此任务,则重新执行到getNextGenerator方法,此时则会返回DataCacheGenerator来处理从Disk缓存加载的任务。

获取图片

首先,图片来源有哪些?

  1. 资源图片:drawable, assets, raw, mipmap这些程序中自带的图片;
  2. 本地图片:本地存储设备上的图片;
  3. 远端图片:我们服务器或者来自第三方服务器的图片,通过URL来获取。这就需要异步网络请求,请求结束以后,要缓存图片,避免重复请求远端图片,造成时间、网络的浪费。
1
2
3
4
5
6
7
8
graph LR;
A[Slide];
B([1. 资源图片]) --> A;
C([2. 本地图片]) --> A;
E{缓存是否存在} --> |是,交给Slide|A;
E --> |否,网络请求|D([3. 远端图片]);
D -.-> |获取到图片并缓存|E;

那么接下来,要丰富的细节,就来到了网络请求缓存了。

网络请求

缓存

本文采用CC-BY-SA-3.0协议,转载请注明出处
Author: boybeak